Setting up a Cadmus link in the LMS
Learn how to set up a Cadmus link from your subject's LMS site
To begin using Cadmus, you’ll need to set up an assessment link in your Learning Management System's (LMS) unit page.
Follow the steps for your relevant LMS:
You can even use our sample assessment descriptions during setup.
Canvas
If you use Canvas as your Learning Management System, follow these instructions to get started with Cadmus.
To create a new assessment link
- Open your subject’s Canvas site and navigate to the Assignments section using the left-hand-side menu.
- Click the + Assignment button.

- Add a Name for the assessment.
- Add a Description. You can use our sample description, which gives students a quick introduction to Cadmus.
- Under Points specify how many marks the assessment is worth.
Please don't set this to 0, to ensure that grades pull through from Cadmus correctly - Specify which Assignment Group you would like the Cadmus assessment to be included in.
- If adding a rubric, click Save. Otherwise, continue to Step 10.
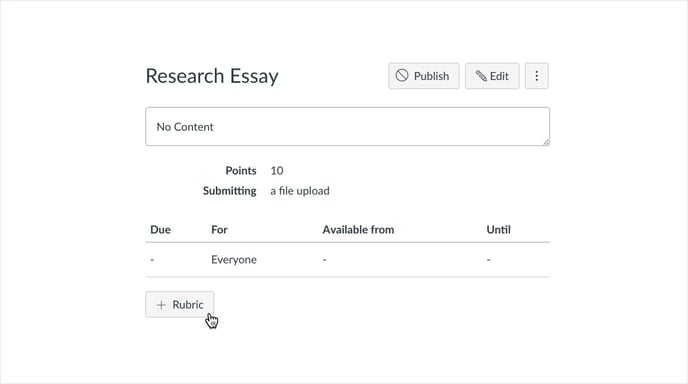
- Click + Rubric to select an existing rubric or create a new one. You'll find more information on creating rubrics in Canvas here.
- Once your rubric has been attached to the assessment, re-enter the assignment settings by clicking Edit.
- In the Submission Type section, select External Tool from the dropdown menu.
- Click Find.
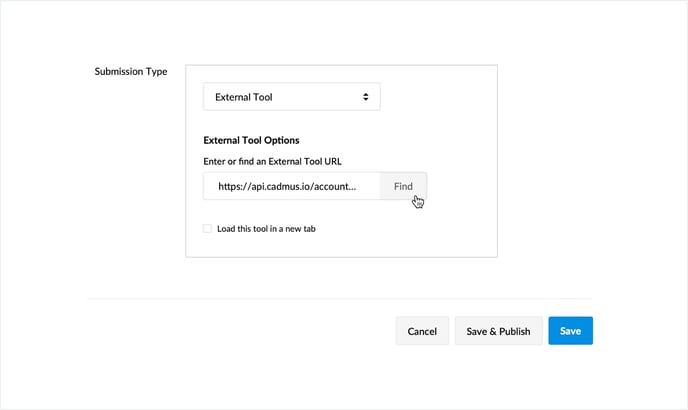
- In the Configure External Tool pop-up, select Cadmus.
- Under Submission Attempts, set Allowed Attempts to Unlimited.
This ensures that submissions and grades are passed through to Canvas correctly.
- Click Save to finish setting up your link.
- You've just created a new Cadmus assessment. Click on the Cadmus link to go to the Cadmus Teacher Environment, where you will set your assessment requirements, or set up an exam, and write the instructions.
Marking your Cadmus assessment using a SpeedGrader rubric? Follow these steps to set one up once your Cadmus link is created.
Blackboard (Learn)
If you use Blackboard Learn as your Learning Management System, follow these instructions to get started with Cadmus.
To create a new assessment link
- Open your subject’s page in Blackboard and ensure Edit Mode is on.
- Navigate to the content area where you’d like students to access your Cadmus task (we recommend the Assessment section).
- From the Assessment (or possibly Build Content) dropdown menu, select Cadmus Assignment.
(Still can't see Cadmus Assignment in the dropdown? You may need to enable Cadmus in Blackboard)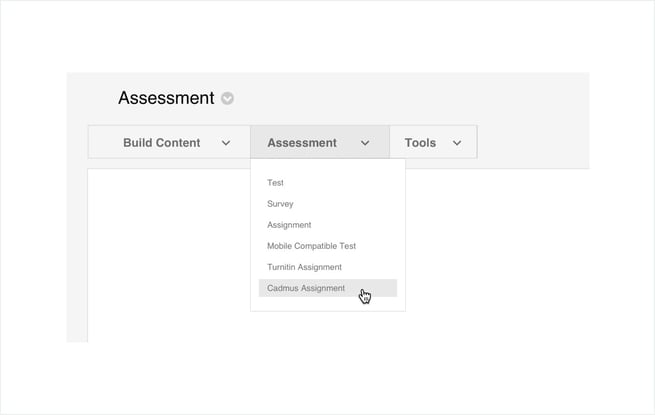
- Add a Name for the assessment.
- Add a Description for the assessment. You can use our sample description, which gives students a quick introduction to Cadmus.
NOTE: You don’t need to set a due date here. You will set this inside Cadmus.
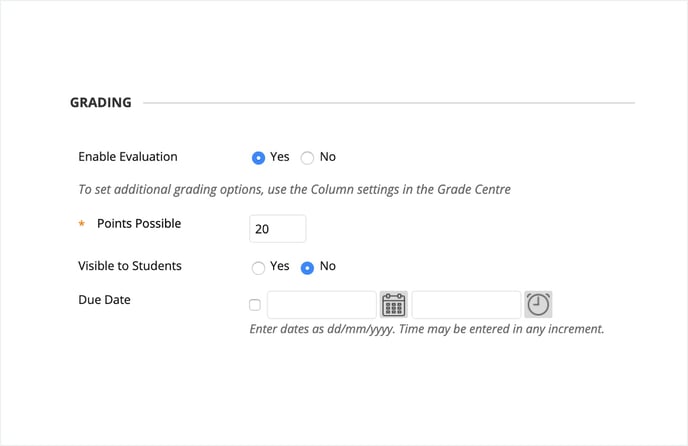
- To enable grades to be pulled through to Grade Centre automatically, in the Grading section:
-
- Select Yes for Enable Evaluation (or Enable Student tracking)
- Set Points Possible to the available marks for the assessment.
Please don't set this to 0, to ensure that grades pull through from Cadmus correctly - Check No for Visible to students. This will hide grades from students in My Grades. You can always change this setting once you’re ready to release grades.
- In the Options section, set Permit users to view this content, depending on whether or not you want to hide the Cadmus link from students.
- Click Submit.
- You've just created a new Cadmus assessment. Click on the 'Go to Cadmus' link to go to the Cadmus Teacher Environment, where you will set your assessment requirements, or set up an exam, and write the instructions.
Blackboard (Ultra)
If you use Blackboard Ultra as your Learning Management System, follow these instructions to get started with Cadmus.
To create a new assessment link
- Open your subject’s page in Blackboard and ensure Edit Mode is on.
- Navigate to the Course Content area, selecting the module or folder where you’d like students to access your Cadmus task.
- Click the + button and select Content Market (or possibly Content Extensions).
- Locate Cadmus and click the + button in the bottom right corner to select.

- Click the ••• menu and click Edit.

- Add a Name for the assessment.
- Add a Description for the assessment. You can use our sample description, which gives students a quick introduction to Cadmus.
- To enable grades to be pulled through to Grade Centre automatically, in the Marking section:
- Click the checkbox for Create gradebook entry for this item..
- Set Mark using the Points.
- Set the Maximum Points to the available marks for the assessment.
Please don't set this to 0, to ensure that grades pull through from Cadmus correctly - optionally assign a Mark category.

- Click Save.
- You've just created a new Cadmus assessment. Click on the 'Go to Cadmus' link to go to the Cadmus Teacher Environment, where you will set your assessment requirements, or set up an exam, and write the instructions.
Feedback release in Blackboard Ultra
In Ultra, releasing grades starts with a manual Sync LMS → Sync grades step. This ensures the updated marks flow correctly into the Ultra Gradebook before feedback is released.
Moodle
If you use Moodle as your Learning Management System, follow these instructions to get started with Cadmus.
To create a new assessment link
- Open your subject’s page in Moodle and ensure Edit Mode is on.
- Navigate to the area where you’d like students to access the Cadmus assessment (we recommend an Assessment section).
- Click Add an activity or resource.

- Select External tool.
- Click Add.
- Add an Activity name for the assessment.
- From the Preconfigured tool dropdown, select Cadmus.
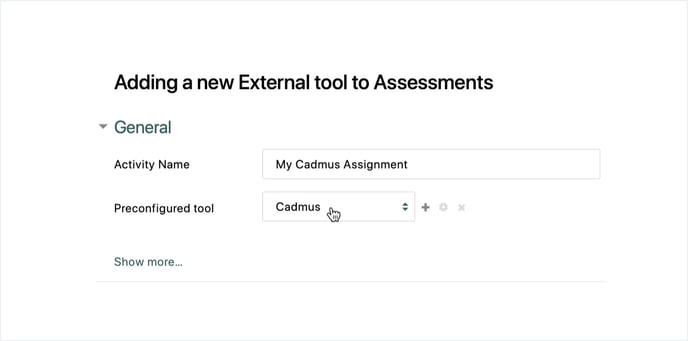
- Click Show more.
- Add an Activity Description. You can use our sample description, which gives students a quick introduction to Cadmus.
- Select Display description on course page.
- In the Grade section, specify the Maximum Grade.
TIP: Please don't set this to 0 — student grades will not pull through from Cadmus correctly. 😬
- Click Save and return to course.
- You've just created a new Cadmus assessment. Click on the Cadmus link to go to the Cadmus Teacher Environment, where you will set your assessment requirements, or set up an exam, and write the instructions.
D2L Brightspace
If you use D2L as your Learning Management System, follow these instructions to get started with Cadmus.
To create a new assessment link
- From your subject's D2L site, navigate to the Content area.
- Find the module where you would like students to access the Cadmus assessment (we recommend an Assessment section).
- Click on the Existing Activities dropdown, and select External Learning Tools.
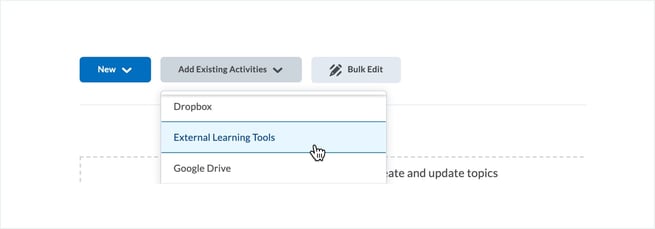
- From the bottom of the Add Activity pop-up, select Create New LTI Link.

- In the Create pop-up, enter the following information:
- The Title of the assessment.
- Under LTI URL, add
ANZ https://api.cadmus.io/accounts/lti1p3/launch UK https://api-uk.cadmus.io/accounts/lti1p3/launch
NOTE: Please select the appropriate URL depending on your region
- Click Create and Insert to confirm.
- At the bottom of the Cadmus section, under Activity Details, click Add grade item.

- Give the grade item a Name and set the Maximum Points for the assessment.
- Click Create.
- Click Save to confirm.
- You've just created a new Cadmus assessment. Click on the Go to Cadmus button to go to the Cadmus Teacher Environment, where you will set your assessment requirements, or set up an exam, and write the instructions.
D2L Brightspace (Deep Link)
D2L Brightspace users can seamlessly attach Cadmus as the submission tool via the external tool selection process. Using the Cadmus deep link feature enables seamless passing of grades from Cadmus into into the gradebook.
To add the Cadmus deep link to a new assessment
- Navigate to your desired course.
- Click the Create New button, then select Assignment.

- Add a Title for the assessment, as well as grading settings and a due date.
For graded assessments, please don't set this to 0, to ensure that grades pull through from Cadmus correctly. - Add a Description for the assessment. You can use our sample description, which gives students a quick introduction to Cadmus.
- Attach the Cadmus deep link:
- Click the 🔗 Quicklink button. Under the Third Party heading, select Cadmus Platform Assessment Deep Link.

- Add an Assessment Name, and optionally select this assessment will be graded, assigning Maximum Grade Points.

- Click Create Assessment. The Cadmus assessment will now display in the Attachments area.

- Click the 🔗 Quicklink button. Under the Third Party heading, select Cadmus Platform Assessment Deep Link.
- Click Save and close.

- You've just created a new Cadmus assessment. Click on the 'Go to Cadmus' link to go to the Cadmus Teacher Environment, where you will set your assessment requirements, or set up an exam, and write the instructions.