Setting up marking groups
Learn how to set up groups to quickly filter your class list
For larger classes, it can be helpful to set up marking groups, making your marking and moderation processes smoother.
In this article we will cover how to:
- Create a new marking group
- Add students to marking groups
- Filter the class list by marking the group
You can also add students to groups by uploading a spreadsheet into Cadmus.
Create a new marking group
Before setting up groups, we recommend syncing the Cadmus class list with your LMS. You can then create new marking groups individually, upload a spreadsheet of students allocated to groups or sync Canvas sections in as marking groups.
To create a new marking group:
- On the Instructions page, in the Marking Groups section, click Set Up.

- Click Create new group, Import a CSV or ZIP, or Sync Canvas sections.
- If you create a new group, add a name for the group.
- Optional (but recommended): Randomly assign students to this group. This is a quick way to create groups for marking.
- Click Create group to confirm.
To add your Markers to the list of options, they would need to access Cadmus through the LMS link first. Until they have done so, you can create your groups with Unassigned Marker, then rename the groups to reflect the Markers' names.
If your Markers are having difficulties with accessing Cadmus from the LMS, please connect with your LMS admin to grant them permission to launch external tools.
Add students to marking groups
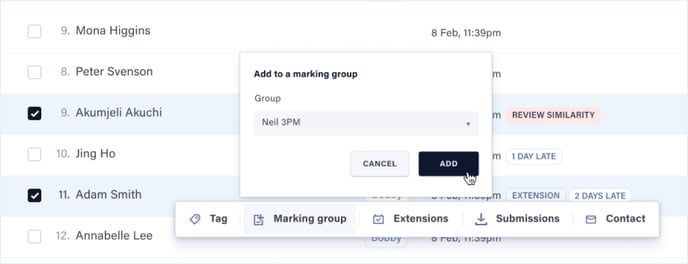
Once a group has been created, you can add and remove students directly from the class list.
To add or reallocate students to a group:
- From the class list on the Progress page, select the students you would like to add to a group.
- Click Marking group.
- Select the group you would like to add the students to. You can also create a new group from here if needed.

- Click Add to confirm.
Filter the class list by marking group
Once you’ve set up grading groups within Cadmus, you can easily filter the class list by group name.
To filter the class list by group name:
- From the Progress, Finals, or Drafts tab, select Marking group in the filter menu.
- Select the group you want to filter by.
TIP! You can also sort students in order of marking group by clicking on the Marking group header in the class list.