Pre-allocated Marking Groups can be used in Cadmus for marking instead of random allocation. This can be set up by uploading a spreadsheet with the student group allocations into Cadmus.
This article covers how to:
NOTE: Follow these links for steps to import sections created in Canvas as marking groups, or groups already created in Blackboard.
Prepare a group spreadsheet to upload
You’ll first need to format your list of groups and allocated students correctly. By the end of this process, you’ll have two .csv files ready to upload into Cadmus: one for Group Names and one for Group Allocations.
For a detailed walkthrough, please watch the video below. We’ve also outlined the steps beneath it for easy reference
To prepare a group spreadsheet to upload
- Download our Groups Upload Template (.xlsx file).
- Open the file in Excel or similar. You will see that the file has two tabs (Group Names and Group Allocations).
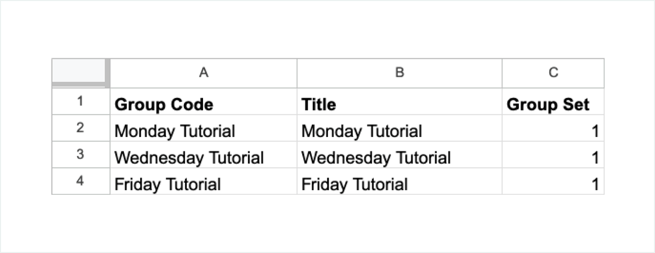
- In the Group Names tab, under Title, list the names of each of the Groups as you'd like them to appear in Cadmus.
- Ensure each group has a unique Group Code — to keep things simple, we recommend making these the same as the Title.
- Allocate each group a Group Set — this allows you to import groups in bulk in Cadmus by selecting the specified set.
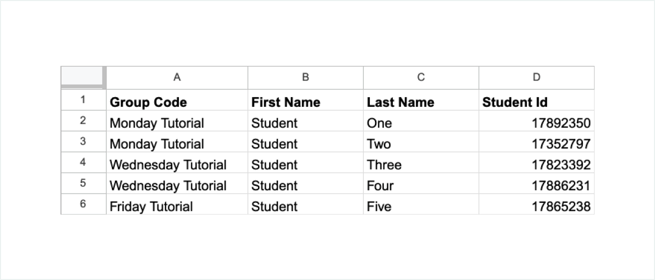
- In the Group Allocations tab, list students' First Name, Last Name, and Student Id, along with their relevant Group Code name. You will need to write student names and IDs as they appear in the LMS.
- Once all the students are allocated, save each tab as a .csv file. Ensure you have named each .csv file according to its corresponding tab titles (i.e. Group names, Group allocations).
NOTE: Please ensure the column headings in the sheets are kept exactly the same to prevent any errors when uploading.
Upload the spreadsheet into Cadmus
Once you have prepared the two spreadsheets (Group Names and Group Allocations), you're ready to upload them into Cadmus.
To upload your spreadsheets to Cadmus
- On the Instructions page, click Set up in the Marking box.

- Click Import Groups from File

- Click Import .CSV or .ZIP File, then select the two .csv files you prepared. You may need to compress both .csv files into a .zip file to do this.
- Select which groups, or group sets, you’d like to import (click all the groups you'd like to add).

- Click Create Group
- Groups created

For markers to appear in the assignee dropdown, they’ll need to launch the specific assessment via the LMS first. Once they’ve done this, their name will be added to the associated teaching staff list in Cadmus.
In the meantime, groups can be named after the markers. Simply click the pencil icon to rename them.

To reuse the groups in a different assessment, simply download them to be reupload in a different setup.
