You can upload images, or screenshots of graphs and diagrams into Cadmus by clicking the ![]() image icon, making it easy to add visuals to your submission.
image icon, making it easy to add visuals to your submission.
This article covers how to:
- Add an image
- Add a graph or diagram
- Resize an image
- Align an image
- Add or remove a caption
- Remove an image
Add an image
With Cadmus, the following image file types are supported: .jpg, .png, .gif and .bmp.
To add an image
- Click the
 image icon in the Formatting Toolbar.
 - When the file browser appears, select the image you would like to upload.
Add a graph or diagram
Cadmus doesn’t currently support creating graphs and diagrams within the editor. It’s still possible to create graphs or diagrams outside of Cadmus and upload them as images.
To add a graph or diagram
- Create your graph or diagram outside of Cadmus (e.g. in Word or Excel).
- Save it as an image, or take a screenshot of it.
- Back in Cadmus, click the image icon in the Formatting Toolbar.
- When the file browser appears, select the image you would like to upload.
Resize an image
Once you’ve added an image to your work, you can resize it by dragging or using the preset size options.
To resize an image by dragging
- Click on the image you’d like to resize.
- Hover over one of the corners of the image.
- Click and drag in or out to your preferred image size.

To resize an image by using preset sizes
- Click on the image you’d like to resize.
- The image toolbar will appear at the top of the image.
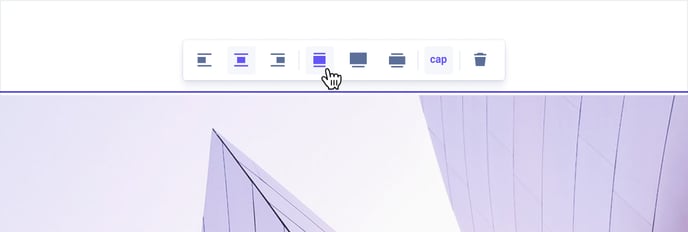
- From this toolbar, select the size option you’d like:
-
- Fit to text: Your image will resize to fit the width of your text.
- Banner: Your image will stretch to be slightly larger than the width of your text.
- Original image size: Your image will try to maintain its true size. If it’s too large for the screen, it will fit the width of your text.
Align an image
Once you’ve added an image to your work, you can align it to your text.
To align an image
- Click on the image.
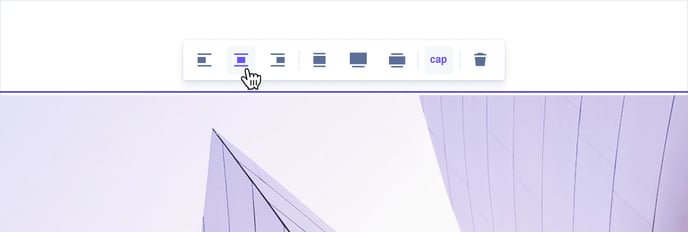
- The image toolbar will appear at the top of the image.
- From this toolbar, click one of the alignment options — left, centre, or right.
Add or remove a caption
Once you’ve added an image to your work, you can choose to add a caption to it.
To add a caption
- Click on the image.
- The image toolbar will appear at the top of the image.
- From this toolbar, click the cap icon.
- Type in your caption in the text field below the image.
To remove a caption
- Click on the image.
- The image toolbar will appear at the top of the image.
- From this toolbar, click the cap icon to toggle it off.
Remove an image
If you’re not happy with the image you’ve added to your work, you can always remove it.
To remove an image
- Click on the image you’d like to remove.
- The image toolbar will appear at the top of the image.
- From this toolbar, click the rubbish bin icon.
You can always click Undo in the formatting toolbar or (⌘+Z / Ctrl+Z) if you change your mind about deleting the image!